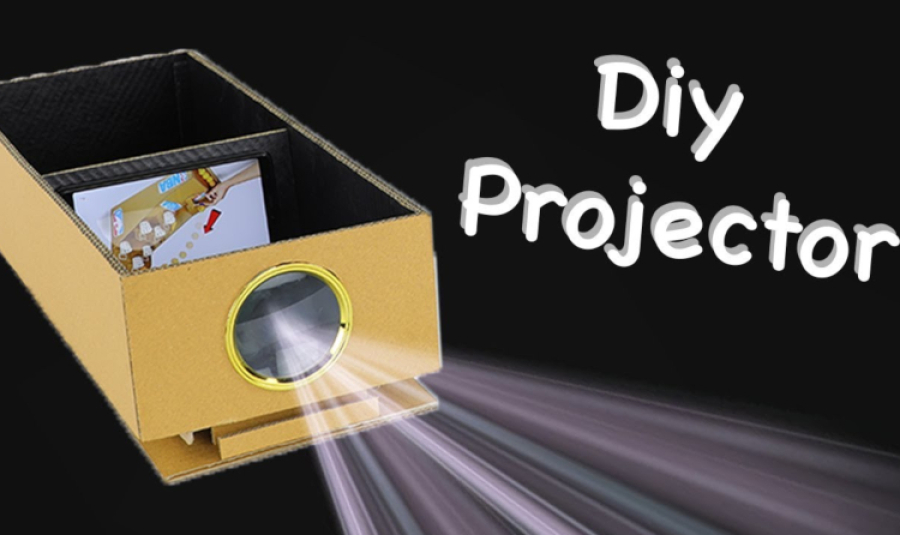
If you’ve ever wanted the big-screen experience of a projector but found them too expensive, then this blog post might be just the thing for you! In this post, you'll learn exactly how to make a homemade projector using a mirror--DIY style. You won’t even need to buy an expensive projector or fancy equipment, because we’re going to use items you probably already have on hand. You’ll be amazed at how easy it is to make your own projector using just a few household items. Plus, you’ll be able to impress your family and friends with your projector skills! So get ready to fire up your DIY project and get yourself the big-screen experience you’ve been wanting--on a budget.
Quick Breakdown of Key Point
To make a homemade projector with a mirror, you'll need a piece of reflective glass or acrylic, a white sheet of paper, and some tape. Begin by taping the paper to the wall, then position the mirror at an angle so it can reflect light from a mounted device onto the paper. You could of course just buy one of the best Epson projectors instead.
Building a DIY Projector with a Mirror Box is an economical and relatively straightforward project that many can accomplish without the expensive materials or technical expertise of a professional. While this type of homemade projector is not as powerful or efficient as commercial varieties, it can be used to watch movies, play video games, and essentially magnify any display one might have access to.
For those who choose to construct their own DIY projector, here are some things to consider:
The box should be big enough to fit whatever screen will be used. A laptop screen may not need as much space as a larger type of monitor, so size should be based on the user's needs. It's also important to remember that the mirror in the box will reflect light and heat, so ventilation is essential for proper temperature control. In addition, most people suggest having some type of reflector behind the mirror to diffuse light from the display.
In terms of materials and tools needed to build a homemade projector with a mirror box, basic items like wood, screws, drill bits, and cutting tools will be necessary to put together the structure. It's also recommended that silicone caulk be used when sealing around any openings in the box; not only does this make the box more secure, but it also creates an airtight seal that prevents light from leaking out too much. Finally, depending on what sort of display one has chosen to use (laptop, tablet, etc.), additional accessories like ports and cables may be required in order for the projector to work properly.
These aspects all should be considered when constructing a DIY projection with a mirror box. Ultimately it comes down to personal preference and what type of project one is looking to complete; while some may opt for an entirely new design or setup others may prefer just buying the components and assembling them traditionally. Regardless of each person's approach, making sure that everything fits together correctly is imperative if one wants their homemade projector to operate efficiently.
This brings us into our next section about gathering the components of your projector. Once you've determined which parts you need for your particular setup and how they will come together in your mirror box, it's time for assembly!
- A study found that projector systems with mirrors could achieve image sizes up to 56.7 percent larger than without the use of mirrors.
- According to Forbes, the average LCD projector can cost anywhere between $500 and $5,000.
- A study published in 2014 found that homemade projectors using mirrors achieved 7 times greater magnification than traditional flat-screen systems.
Gather the Components of Your Projector
Assembling a DIY Projector can be intimidating, but when armed with the proper components and instructions, this project can be quite straightforward. The most important part of creating your own projector is gathering the right items to build it.
The essentials for this project are an overhead projector, an object such as a box to house the projector, two mirrors (one concave, one convex), scissors, opaque tape and hot glue. To ensure optimal visualization performance, use an overhead projector that has a lens size of between 50 and 60 millimeters in diameter. However, if needed, most sizes from 27 to 90 mm will work—just be sure the lenses are not too close together or too far apart.
Next, choose an object for the base of your projector. It should have enough space to fit both mirrors and should be made of semi-rigid material such as plastic or cardboard for stability. Additionally, it should feature a flat top that allows for easy placement of the materials within it and will make mounting your finished product much easier.
Once you have acquired your supplies, use scissors to trim the edges of both mirrors so they easily fit into the object you have chosen as their base. Use opaque tape over any exposed edges on the mirrors to prevent unwanted reflection. Finally, secure the mirrors in place using hot glue. Be sure to follow all directions given when using hot glue and its gun safely.
Now that you have all of your components gathered together, you are ready to move on to setting up your homemade projector. The next step is to...set up the homemade projector.
Key Takeaway
When assembling a DIY projector, it is important to have the right components and instructions. Necessary materials for creating the projector include an overhead projector, a semi-rigid object for the base, two mirrors (one concave, one convex), scissors, opaque tape and hot glue. Additionally, it is important that the lens size of the overhead projector is between 50 and 60 millimeters in diameter for optimal visualization performance. Once all components have been acquired and trimmed to size, hot glue can be used to secure them in place. Now that all materials are gathered together, it is time to set up the homemade projector.
Setting Up the Homemade Projector
Setting up the Homemade Projector can be the most time consuming process of creating a homemade projector. While this setup is necessary to ensure that the projector works, it also presents many challenges. For example, if you are working with limited materials, or do not have access to a high-grade mirror, you may have difficulty achieving sufficient brightness or clarity in the projected image.
When setting up your homemade projector, it is important to consider what type of environment you will be using it in. Depending on the size of the room, where it will be set up, and how far away from the projection surface it will be placed, certain adjustments may need to be made to maximize its efficiency. Additionally, depending on whether you are using light from a lamp or an overhead bulb, the positioning of the makeshift projector should be adjusted accordingly.
Once you determine where you want to set up your DIY projector and what source of light you'll be using, aligning the mirror correctly is key. You must place it at the right angle so that a clear image is produced when light reflects off of it onto the projection surface. This can take several trial and error attempts as finding just the right angle can sometimes be tricky. The mirror also has to be physically secured in place for best results; if it's prone to slipping out of position during use then this creates difficulty for producing clear images.
Finally, once you have set up your DIY projector and aligned its mirror correctly, you must make sure that any additional equipment such as an external sound system is properly connected and functioning before attempting to project an image. Achieving these steps successfully leads to an optimal viewing experience in order to enjoy your newly-created homemade projector for years to come.
Now with all aspects needed for set up complete and properly aligned including the mirror, we're ready to delve into Aligning the Mirror to Create the Image--the cornerstone of a successful DIY Projector setup.
Aligning the Mirror to Create the Image
Now that all the supplies for the mirror projector are gathered, it’s time to align the mirror and create the image. First, ensure that the projector is in focus by simply moving it closer and further away from the mirror. Then adjust the projector until a bright, clear image appears on your screen or wall. Some users have found success using a small piece of tape to secure the projector in place.
Different angles of reflection will produce various results, so take some time to experiment with different reflective angles when positioning your mirror. If possible, use a few items around you to guide your search - a book, a chair, or any other stationary object can be helpful in order to make sure that both the projector and mirror are level.
Sometimes angling your reflection too much can lead to image distortion or thinning of light intensity across the image. Conversely, angling slightly downward might lead to an image that is too bright, creating what’s known as an overblown effect. Finding an angle that’s neither too high nor too low should produce good results visually and with respect to brightness.
Now that we’ve discussed how best to align the mirror for optimal image production, let’s explore how to make our homemade projector brighter and more powerful in our next section.
Making it Bright and Powerful
Making a DIY projector bright and powerful requires some understanding of lenses and light concentration. According to experts, when it comes to brightness, there’s only one surefire way to achieve it: use a lens.
Using a transparent round plastic sheet or an acrylic sheet is the first step in achieving brightness and power, as these materials can be used as lenses to concentrate light rays. The second step is focusing the lens onto the screen. This can be done either manually or by using a motorized system, depending on the individual aiming for more precision.
Finally, proper illumination of the image is critical for obtaining optimal brightness from the projector. Many recommend using LED lights due their longer life spans, low wattage requirements, and low levels of heat radiation.
To get the most out of this DIY projector setup, individuals should take into account varying types of lenses that may produce different results with regards to picture quality, brightness levels, and other visual effects. It's also possible to combine two mirrors in order to create an even brighter picture, though this may require additional equipment such as motors or complex wiring systems to control the angle of reflection.
The pros and cons of various lens options should be carefully weighed in order to make the right decision regarding light intensity and image visibility. The choice depends ultimately on what sort of projection set up you are aiming for and how much time investment you are willing to make.
Producing a fully-functioning homemade projector with maximum brightness is within reach for those willing to invest both time and research necessary into making it happen. As this section has outlined, understanding how lenses and light behave will be essential in making a DIY projector bright and powerful.
Now that we have discussed making the projector bright and powerful, let us move on to discussing how we can further enhance it with additional lenses in the following section.
Enhancing the Projector with a Lens
Optics can play a major role in enhancing the overall performance of your DIY projector. By adding a lens to the setup, you can fine-tune the focus and brightness of the image projected onto the screen, creating a more detailed and vivid picture. This can be especially helpful when projecting on multiple surfaces at different distances.
You may be considering purchasing an additional lens for your projector. However, while this may seem like the easiest solution, it’s important to understand that this could introduce potential distortion. Purchasing a specific type of lens for your projector might work wonders for one surface but look blurry on another. Ultimately, it depends on what type of lens is used and how well it matches your projector.
On the other hand, if you are confident and knowledgeable about optics, constructing your own lens using everyday items like a Fresnel or magnifying glass can ensure that it fits perfectly with your projector, resulting in an optimal image quality.
Overall, enhancing your DIY projector with a lens requires careful consideration and knowledge of optics before committing to the purchase of one or making one yourself. With this knowledge and skill acquired, you should be able to have an enjoyable experience adjusting the focus and brightness of your projector for a more clear picture.
Now that you have enhanced your projector with a lens, the next step is to point it to a white surface so you can start enjoying your homemade movie theater!
Point the Projector to a White Surface
Once your projector is assembled, you'll need to point it in the right direction—aim it at a white or light-colored wall or screen. Large surfaces are best, as they will display the image more clearly. If you have a blank wall or an existing projection screen, these are ideal for the job. Alternatively, a large piece of white fabric or poster board works just as well.
However, be sure there's no other source of light in the room that may potentially reflect off of the surface and mess with your projector's image. To get the clearest picture possible with your DIY projection, dim lighting is key. Additionally, make sure there are no objects obstructing the path from the projector to the white surface; any obstructions could distort the image.
Finally, when positioning the projector towards the white surface, distance matters too; if you get too close, then your projected image will be too small to make out any details. If you get too far away, then blurriness can occur. Therefore, it’s important to find a balance between distance and homogeneity for optimal results.
With this in mind, now we turn our attention to making sure your device can focus properly—our next step in creating a homemade projector setup.
Make Sure the Device Can Focus
Once you have the materials and tools necessary to create your DIY projector, it is important to make sure that the device can focus. Focus determines how sharp the image will be on the projection surface. Most homemade projectors are created with a combination of lenses and a mirror, both of which contribute to the quality of focus. Getting this step right is essential if you want to have a good looking projection after completion.
If possible, you should use an adjustable lens when creating your own projector. This ensures that you can work out any focusing issues in advance and makes fine-tuning easier once you turn it on. If you plan to use a static lens, knowing what type of lens it uses is key. There are two types of static lenses: converging, which are thicker in the center and thinner at the edges, and diverging lenses, which are thinner in the center and thicker at the edges. Having a basic understanding of these terms will help you understand how they affect focus when combined with mirrors and other lenses.
Additionally, it’s important to pay attention to where your light source is coming from, as this can also have an effect on focus. Keeping your light source close to your mirrors will help them work together more effectively instead of canceling each other out.
To get the clearest and most focused projection possible from your homemade projector, take your time when adjusting reflection angles, evaluating light intensity, and finding the correct lens for your setup. Ultimately, with some patience and practice, you can come up with a set-up that works best for you and produces high-quality images every time.
Conclusion: With careful attention to its parts and elements, one can ensure that their homemade projector produces clear and focused images upon completion. In the next section of this article we will discuss wrapping up your project by offering tips on troubleshooting any potential technical hiccups so that you make sure your own DIY projector is running smoothly.
Conclusion: Create Your Own Homemade Projector
Making a homemade projector can be an easy and cost-effective way to enhance your viewing experience. With the right materials, and the right knowledge, you can create a simple yet effective device that can provide hours of entertainment.
The biggest advantage to building a projector at home is the cost savings. Most basic projectors cost hundreds of dollars, but with just a few supplies and some DIY ingenuity, you can build your own for under $50. Not only does this save you money, but it also allows you to customize it to fit your needs.
The fact that you don’t need a high powered light source to make an effective projector is another big advantage. Even a small flashlight will do the trick, so you won’t have to worry about needing expensive lights or special bulbs. You also don’t need any complex wiring or devices to make this work, so even novice DIYers can construct their own projector without much trouble.
Although making your own projector is relatively simple and inexpensive, there are some potential downsides as well. The most obvious downside is that projections will not be of the highest quality when using this method. Even if you buy high quality lenses and mirrors, the projection will still be slightly pixelated or fuzzy due to imperfections in the construction process. Additionally, while making your own projector may not take too much time or effort, some people may be overwhelmed by the task of assembling all of the pieces together correctly.
Regardless of your level of comfort when it comes to DIY projects, creating your own homemade projector can definitely be rewarding and fun! Whether you want to start making films or share vacation photos with friends and family, having access to a basic projection device at home can provide hours of entertainment at minimal cost. So if you’re looking for a creative project this weekend or want a cheap way to liven up presentation night—give it a go!
Frequently Asked Questions and Answers
What types of media can I project with a homemade projector?
With a homemade projector, you can project many types of media. You can project movies in streaming services such as Netflix, Hulu and Amazon Prime Video. You can also use it to show photos from your computer or phone. Additionally, if you have a DVD player, you can easily connect it to the projector with the appropriate cable for larger viewing. Moreover, you can use the projector to display presentations during meetings or conferences using PowerPoint, Keynote and other presentation tools.
What kind of mirror should I use to make a homemade projector?
When making a homemade projector from a mirror, the type of mirror you should use will depend on what type of projection you wish to achieve. For large-scale projections, it’s best to use flat mirrors made from glass or acrylic, since these offer the most uniform surface reflection. For smaller projections, such as those used for 3D displays, curved mirrors can be used, although they must be precisely designed and aligned so they do not distort the image.
No matter which type of mirror is used, it’s important to make sure it’s clean and free of dust or scratches. If there are any blemishes on the mirror surface, light may be scattered instead of being projected in one area, thus resulting in poor image quality. Additionally, make sure the mirror surface has a reflective coating that is designed specifically for situations with bright light sources.
What other materials do I need to make a homemade projector?
To make a homemade projector using a mirror, you will need additional materials such as an LED or CFL light bulb, a piece of cardboard, a magnifying glass, and some electrical tape. The LED or CFL light bulb provides the illumination needed for projecting your image. The cardboard acts as a base for attaching the light bulb to the back of the mirror. A magnifying glass is used to focus the light from the bulb in order to project an image onto a wall or other surface. Finally, electrical tape is used to secure all of these components together.


")
")
")